IMAP / SMTP server setup (administrator)
Already have a mailbox somewhere — your own mailserver, your hosting provider, FastMail, Mailcow, or any standard email service — and want it inside Odoo? This page walks you through connecting it with a username and password, step by step. By the end you'll have a mailbox that receives new mail automatically and sends from your real address, all without leaving Odoo.
Already have a mailbox somewhere — your own mailserver, your hosting provider, FastMail, Mailcow, or any standard email service — and want it inside Odoo? This page walks you through connecting it with a username and password, step by step. By the end you'll have a mailbox that receives new mail automatically and sends from your real address, all without leaving Odoo.
This is the right path for any mailserver that speaks standard IMAP (for receiving) and SMTP (for sending) — including Gmail or Outlook when you have to use an app password instead of the one-click sign-in.
Available in: Basic. The incoming and outgoing servers are standard Odoo mail server records that the MailDesk engine drives, so this works exactly the same with or without Pro.
Have Gmail or Outlook? The sign-in path is easier
For Gmail/Google Workspace and Outlook/Microsoft 365, the one-click sign-in (OAuth) path is faster, stores no password, and you can revoke it any time. Reach for IMAP/SMTP for those providers only when sign-in is not possible — see Gmail OAuth setup. The IMAP path for Gmail needs an App Password, which is covered at the bottom of this page.
Before you start
You'll move quickly if you have these ready:
- MailDesk Basic installed — works on Odoo 17, 18, or 19; the steps below are identical on each.
- IMAP turned on at your mail provider (it usually is by default).
- Four addresses and ports: the incoming (IMAP) host and port, and the outgoing (SMTP) host and port.
- The mailbox login and password — or an app password if your provider requires one.
- A quick check that your Odoo server is allowed to reach those hosts and ports (most are, but a tight firewall can block them).
Who can do this
Configuring mail servers and mailbox accounts is a Mailbox Admin task in MailDesk. The server menus appear only for administrators, under MailDesk → Configuration → Mailboxes.
How the three pieces fit together
A working mailbox is really three small records, and MailDesk wires them together for you:
flowchart LR
    A[Mailbox Account] -->|Incoming Mail Server| B[Incoming server<br/>IMAP — receives mail]
A -->|Outgoing SMTP Server| C[Outgoing server<br/>SMTP — sends mail]- The incoming server holds the IMAP host, port, encryption, username and password. Its Server Type tells MailDesk how to sign in — plain IMAP password, Gmail sign-in, or Outlook sign-in.
- The outgoing server holds the SMTP host, port, encryption, username and password.
- The mailbox account points at both, and adds the friendly name, who can use it, and the signature. See Mailbox account setup for that record in detail.
You'll build them in that order below: incoming first, outgoing second, then link them on the account.
Common provider settings
Not sure what to type? These are sensible starting points. Always confirm against your provider's own help pages, because hosts and ports do vary.
| Provider | Incoming (IMAP) | Outgoing (SMTP) | Notes |
|---|---|---|---|
| Your own / Mailcow / generic host | host from your provider, port 993 (SSL/TLS) or 143 (STARTTLS) | host from your provider, port 465 (SSL/TLS) or 587 (STARTTLS) | Check your mailserver's documentation |
| Gmail (app password) | imap.gmail.com, port 993 |
smtp.gmail.com, port 465 or 587 |
Needs 2-Step Verification + an App Password; the sign-in path is recommended instead |
| Outlook / Microsoft 365 (app password) | outlook.office365.com, port 993 |
smtp.office365.com, port 587 |
The sign-in path is strongly recommended instead |
| FastMail | imap.fastmail.com, port 993 |
smtp.fastmail.com, port 465 |
— |
| ProtonMail Bridge | 127.0.0.1, port 1143 |
127.0.0.1, port 1025 |
Requires the ProtonMail Bridge app running locally |
The port follows your encryption choice
When you pick IMAP Server as the Server Type, Odoo fills the port in for you based on the SSL/TLS switch: 993 with SSL/TLS on, 143 with it off. If your provider uses a different port, just type it over the suggestion.
Step 1 — Create the incoming (IMAP) server
This is the record that receives your mail.
- Open the MailDesk app.
-
Go to Configuration → Mailboxes → Incoming Mail Servers, then click New.
-
Fill in the form (it's titled Incoming Mail Server): - Name — a label so you'll recognise it later, for example Support IMAP. - Server Type — choose IMAP Server for a standard mailbox. (The same list also offers Gmail OAuth Authentication and Outlook OAuth Authentication, which belong to the sign-in path, not this one.) - Under Server Information: enter the Server Name (your IMAP host, e.g.
imap.example.com), the Port, and turn SSL/TLS on for an encrypted connection. - Under Login Information: enter the Username (usually your full email address) and the Password (the mailbox password, or an app password if your provider needs one). -
Click Test & Confirm in the form header to check the connection and credentials in one go.
What you should see: the server status flips from Not Confirmed to Confirmed — that's MailDesk telling you the IMAP login succeeded.

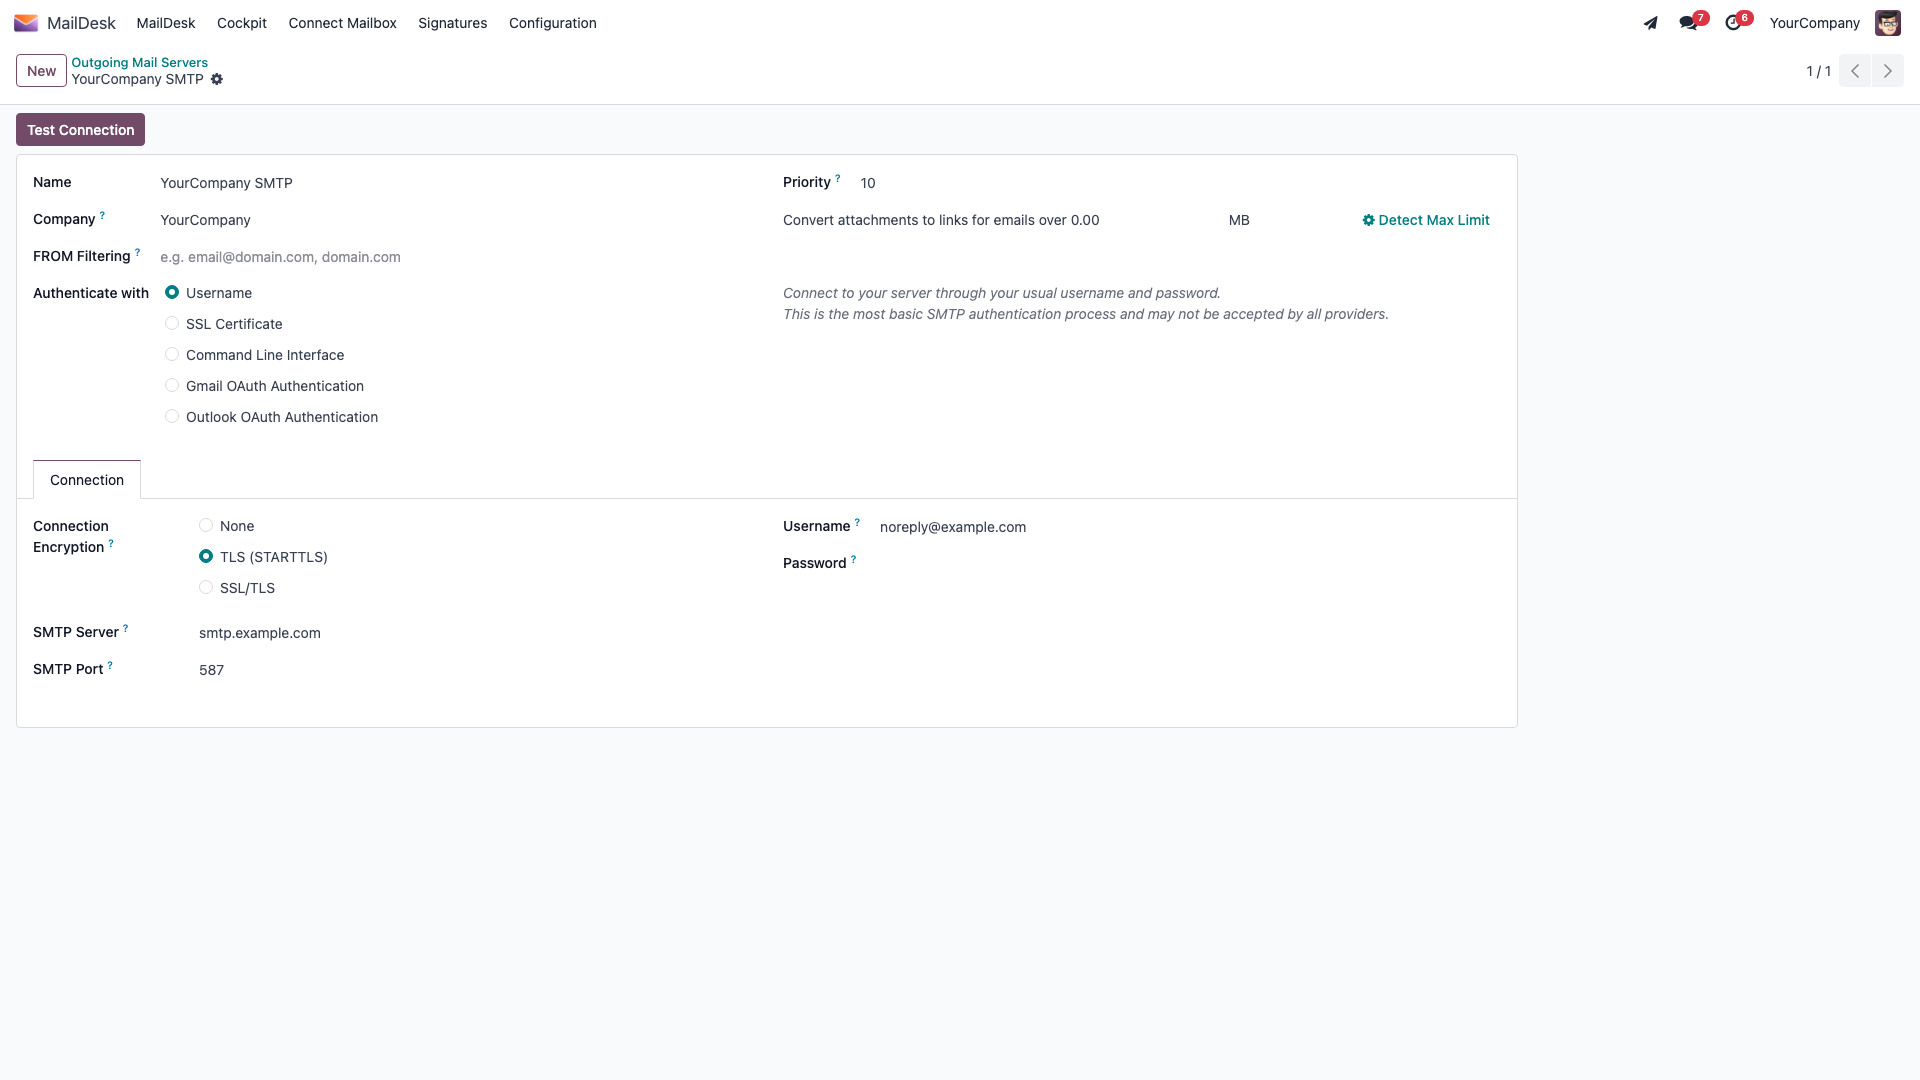
Step 2 — Create the outgoing (SMTP) server
This is the record that sends your mail.
-
Still in MailDesk, go to Configuration → Mailboxes → Outgoing Mail Servers, then click New.
-
Fill in the form (titled Outgoing Mail Servers): - Name — a label for this server. - Connection Encryption — choose SSL/TLS or TLS (STARTTLS) to match your provider. - SMTP Server — the SMTP host, for example
smtp.example.com. - SMTP Port — for example 465 for SSL/TLS, or 587 for STARTTLS. - Username and Password — the SMTP login. This is often the very same credentials you used for IMAP. -
Click Test Connection to confirm the server accepts your login.
What you should see: a green success notification confirming the SMTP server is reachable and the credentials work.
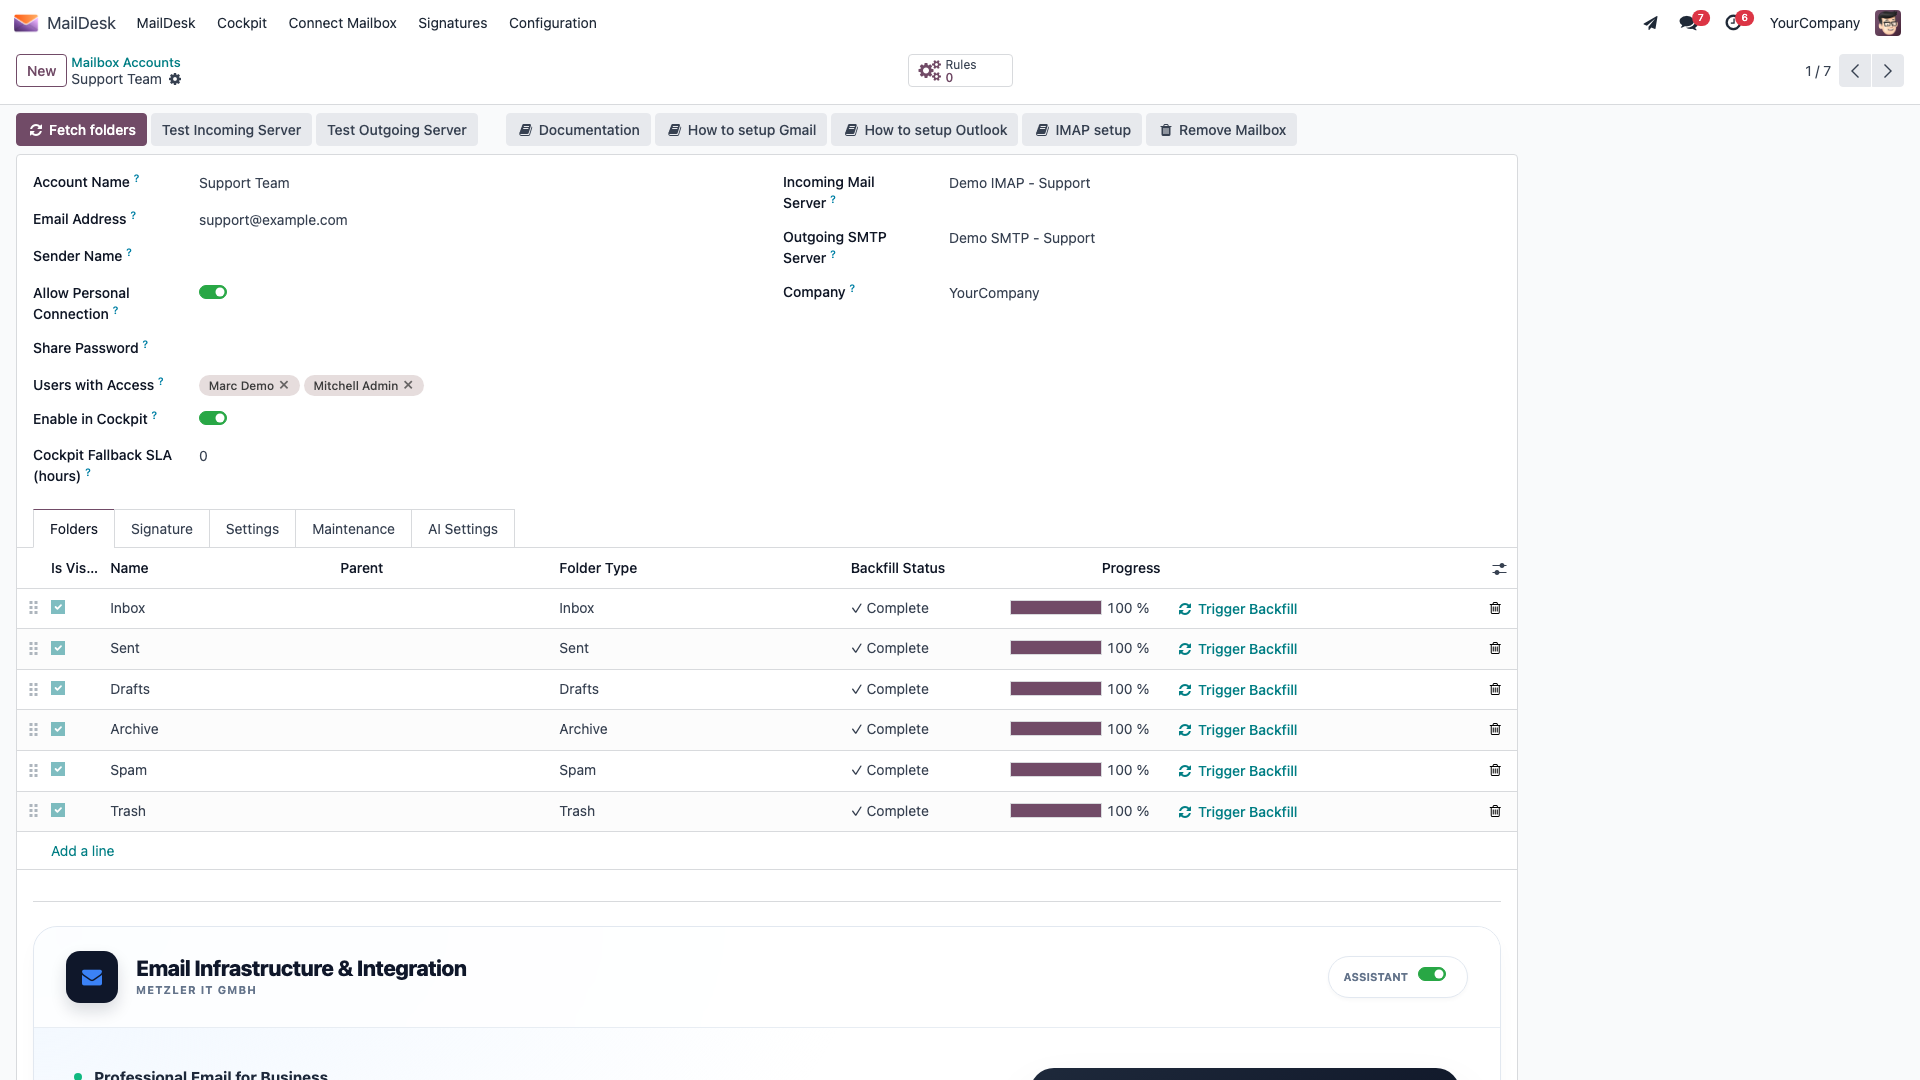
Step 3 — Attach the servers to a mailbox account
Now bring the two halves together so MailDesk knows they belong to one mailbox.
- Open or create the mailbox account (see Mailbox account setup for the full walkthrough).
- Set Incoming Mail Server to the IMAP server you built in Step 1, and Outgoing SMTP Server to the SMTP server from Step 2.
- Save the account, then use the buttons in the form header: Test Incoming Server, Test Outgoing Server, and finally Fetch folders.
What you should see: both tests report Connection Test Successful!, your folders appear on the Folders tab, and MailDesk starts filling the mailbox with your messages.
One server, one mailbox
Each incoming server and each outgoing server can be linked to only one mailbox account, so MailDesk never gets the connections crossed. If you need several mailboxes, just create a separate server record for each.
Gmail over IMAP (App Password)
Only reach for this when the Gmail sign-in path isn't an option for you.
- In your Google Account, turn on 2-Step Verification.
- Create a Google App Password for Mail and copy the 16-character code.
- Build the incoming server with Server Name
imap.gmail.com, Port993, SSL/TLS on, Username = your full Gmail address, Password = the app password. - Build the outgoing server with SMTP Server
smtp.gmail.com, SMTP Port465or587, the matching encryption, and the same username and app password.
Some Google Workspace accounts block app passwords
A Workspace administrator may switch app passwords off, or restrict which clients may connect by IMAP. If app passwords aren't available to you, use Gmail OAuth setup instead.
How the mailbox stays in sync
Once a server is attached and confirmed, you're done — MailDesk keeps the mailbox fresh on its own with automatic background jobs. There's nothing to schedule by hand. New mail appears within the normal polling window, and an open MailDesk view refreshes itself as messages arrive. For the full picture, including the near-realtime push options, see Realtime & synchronization architecture.
Sent mail with IMAP
By default, MailDesk drops a copy of each message you send into the mailbox's Sent folder — the Append Sent to IMAP option on the mailbox account. If your mailserver already saves sent mail itself, switch this option off to avoid seeing two copies.
Troubleshooting
Most setup hiccups come down to a wrong host, port, or encryption choice. This table covers the usual ones.
| Symptom | Likely cause | What to do |
|---|---|---|
| Can't connect to the incoming server | Wrong host or port, encryption mismatch, or a firewall | Re-check Server Name, Port, and SSL/TLS; confirm the Odoo server can reach the host |
| Login fails on Test & Confirm | Wrong username/password, or the provider needs an app password | Verify the credentials in webmail; create an app password if 2-step verification is on |
| Test Connection fails on the outgoing server | Wrong SMTP host/port or encryption | Match SMTP Server, SMTP Port, and Connection Encryption to the provider; try 465 (SSL/TLS) or 587 (STARTTLS) |
| Sent mail doesn't show in Sent | The Sent folder isn't synced, or has a non-standard name | Click Fetch folders and make sure the Sent folder is selected; its name varies (Sent, Sent Items, Sent Messages) |
| The same email appears more than once | The message lives in several server folders | This is normal IMAP behaviour — one entry per folder |
| Initial sync seems slow | A large mailbox | The newest messages load first; older mail fills in afterwards in the background |
Related
- Mailbox account setup — the account that points to these servers, plus shared mailboxes and access control.
- Gmail OAuth setup — connect Gmail/Google Workspace by sign-in instead of a password.
- Realtime & synchronization architecture — how new mail is fetched and the view kept fresh.