Link an email to an Odoo record
That important customer email is sitting in your inbox — but the deal it belongs to lives in CRM, the issue lives in Helpdesk, and the order lives in Sales. MailDesk closes that gap. In a couple of clicks you connect an email to the exact Odoo record it concerns, so the conversation and the work finally live in one place — and the link stays put even after you file, archive, or re-label the email.
That important customer email is sitting in your inbox — but the deal it belongs to lives in CRM, the issue lives in Helpdesk, and the order lives in Sales. MailDesk closes that gap. In a couple of clicks you connect an email to the exact Odoo record it concerns, so the conversation and the work finally live in one place — and the link stays put even after you file, archive, or re-label the email.
Available in: Pro. The Link to Record action ships with MailDesk Pro and works on its own: from any email you can link to any Odoo record that has a discussion (chatter), no extra module required. The per-record-type integrations (CRM, Helpdesk, Sales, Calendar) are optional — they add a dedicated side panel and "create a record straight from the email" on top of the linking that Pro already gives you. See Available in below.
What a link actually is
A link is a small, stored connection between one email and one Odoo record. You decide from the email which records it belongs to. From then on, the email shows up inside that record's discussion (chatter), so anyone who opens the record sees the relevant correspondence in context — without anyone forwarding, copy-pasting, or asking "where's that email again?"
There are three natural moments to create a link:
- Link an email you received to one or more existing records.
- Create a brand-new record from an email — for example a new lead or ticket — and the new record is linked back to the email automatically.
- Bind a reply to a record while you write it — the link is saved the moment your message goes out.
Why your team will love it
- Nothing falls through the cracks. The email and the work it concerns stay together — no parallel filing system in someone's head.
- Context for everyone. A colleague opening the deal or the ticket sees the email conversation right there in the record's chatter. No "can you forward me that thread?"
- Completely safe. Links are local metadata only. Creating, changing, or removing a link never touches the email on your mail server and never sends anything to the sender.
Before you start
- MailDesk Pro installed and a mailbox connected. That is all you need for the generic Link to Record action — it can link an email to any Odoo record that has a discussion (chatter) and that you are allowed to see.
-
Optionally, the matching integration for the record types where you want the richer experience (a dedicated side panel and "create a record from this email"):
Record type Add this integration for the dedicated panel CRM lead / opportunity CRM integration Helpdesk ticket Helpdesk integration Sales quotation / order Sales integration Calendar event / meeting Calendar integration -
When installed, the integration must be switched on for the mailbox — each one adds its own settings card on the mailbox account form, set up by an administrator.
- MailDesk runs on Odoo 17, 18, or 19 — the steps are the same on each.
You can only link to apps you can already open
Linking respects your normal Odoo access. If you can't open CRM, you won't be able to link an email to a lead — and that record type simply won't appear in the picker. This is by design, so links never expose records a person isn't allowed to see.
Step by step — link an email you received
This is the everyday flow, and it works with Pro alone — no per-type integration needed.
- In MailDesk, open the email you want to link (or select one or more rows in the message list).
-
Click Link to Record in the open email's toolbar. (You can also right-click a message row — or several selected rows — and choose Link to Record… from the menu.) The Connect Records window opens.
-
Pick the kind of record from the model selector on the left (the little database icon). Every chatter-enabled app you have access to is listed; start typing in the Filter models… box to jump to the one you want — for example Lead/Opportunity or Ticket.
-
Find the record. Type a name or an ID in the search box (Search for records by name or ID…) and click Find Records. Matching records appear as cards on the left, each showing its name, its ID, and — where it makes sense — a status badge.
-
Click a record to link it — instantly. The card highlights, a check appears, and the record drops into the Linked Records list on the right. The link is saved straight away, no extra confirmation. Click as many as you need; clicking a record that is already linked unlinks it again.
-
Want to check before you commit? Each result has two small buttons: the eye opens a quick preview of the record in a pop-up, and the external-link arrow opens it in a new browser tab.
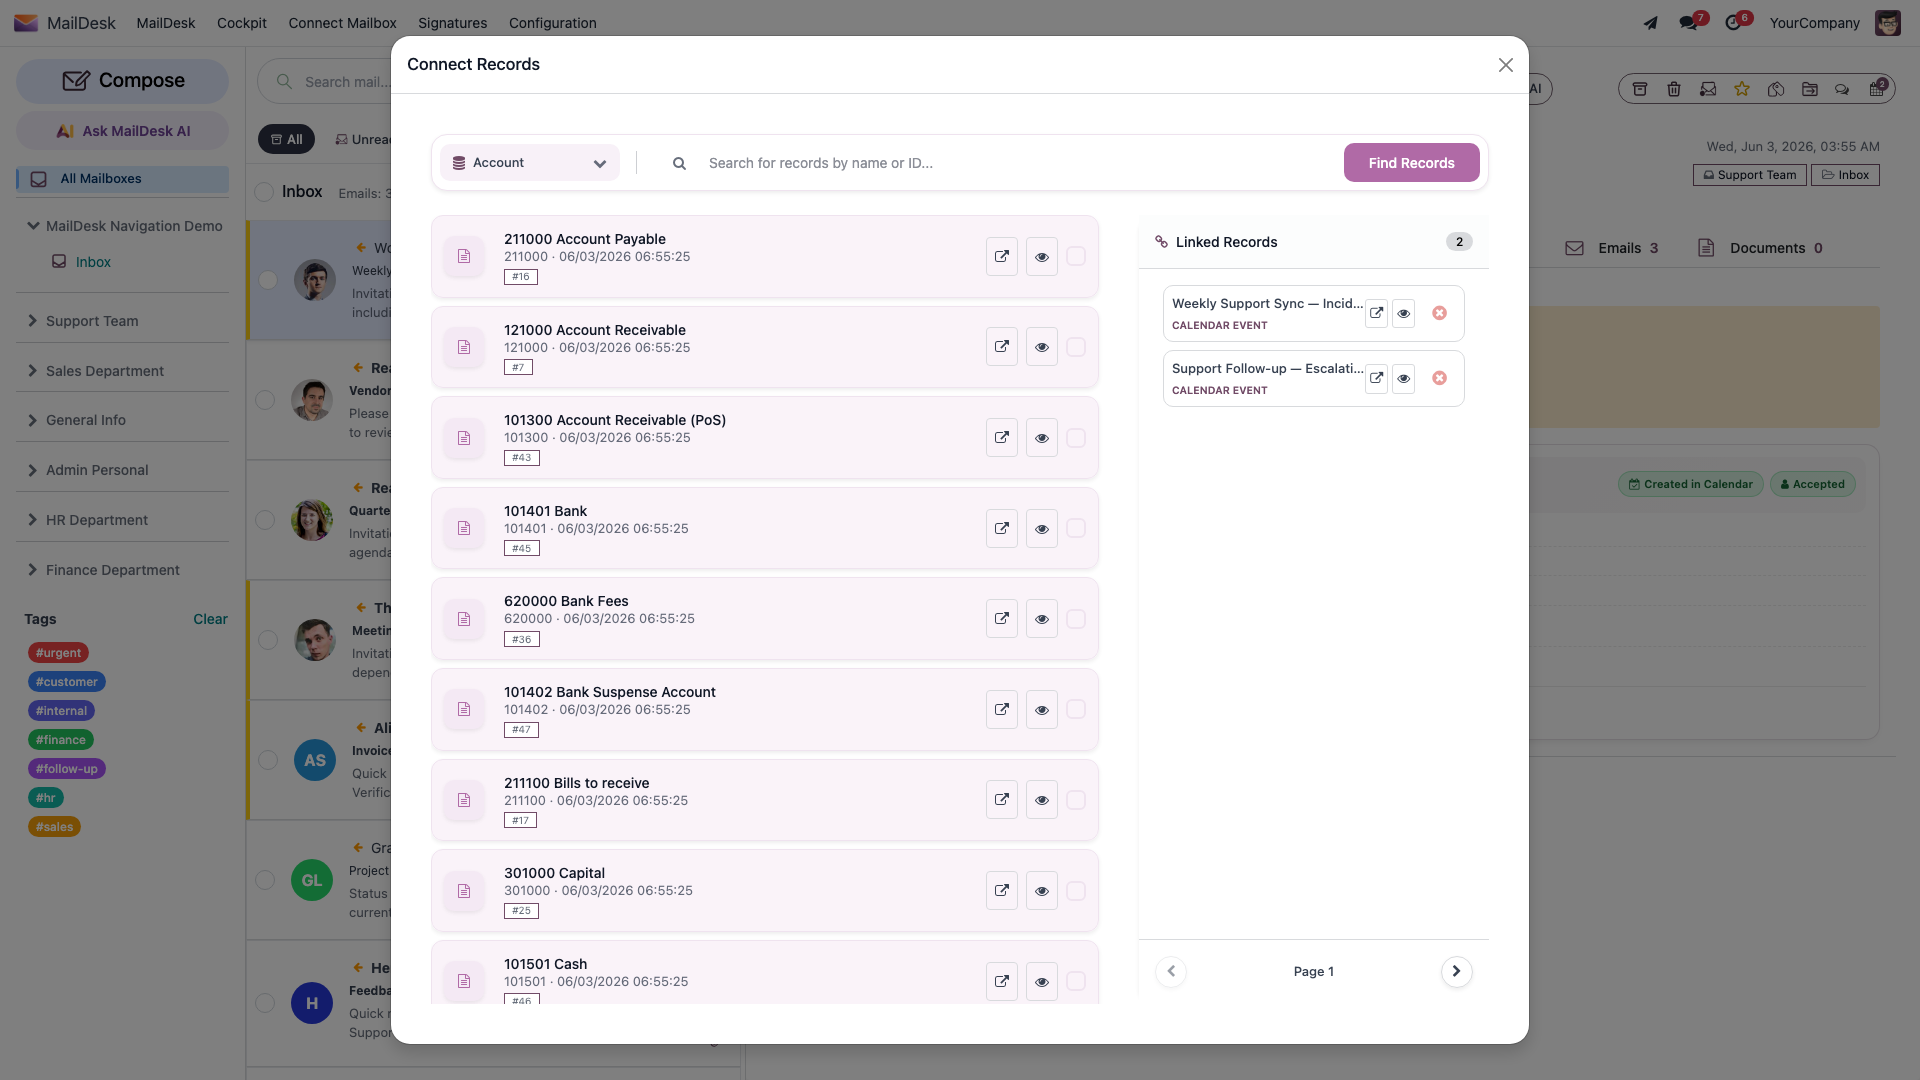
- Close the window with Save Changes (or Cancel). Both buttons simply close the dialog — your links were already saved the moment you clicked each record, so there is no separate "submit" step, and Cancel does not undo links you already made.
Linked the wrong record? Remove it in one click
In the Connect Records window, every entry in the Linked Records list has a small × (remove) control. It takes effect the instant you click it — there's no separate save step. Removing a link only severs the connection: the email and the record both stay exactly as they were.
What you'll see: the record now appears in the email's Linked Records list, and the email shows up inside that record's chatter the next time the record is opened. (See Chatter integration for how linked emails appear on a record.)
The richer way — a dedicated panel (optional)
If the matching integration is installed and switched on for the mailbox, the open email also gains a dedicated side panel for that record type — a CRM panel, a Helpdesk panel, and so on. From there you can link to an existing record or create a new one straight from the email. Think of it as a shortcut layered on top of the generic action above, not a replacement for it.
Step by step — create a new record from an email
Got an email that should become a fresh lead or ticket? Skip the copy-paste.
- Open the email in MailDesk.
- Open the integration panel for the record type you want (for example the CRM panel).
-
Choose the create option in that panel (for example Create lead). The new record is pre-filled from the email.
-
Complete and save the record.
What you'll see: the new record is created and linked to the email automatically — it becomes the email's primary link for that record type (see Primary and secondary links).
Step by step — bind a reply to a record while you write it
You can attach an outbound message to a record before you send it.
- Start a reply or a new message in MailDesk.
-
Click Bind to record in the composer and pick the record.
-
Compose and send as usual.
What you'll see: when the message is sent, the link to the chosen record is saved — so your outbound reply is attached to the record just like an inbound email would be.
Primary and secondary links
When one email is linked to several records of the same type (say, two CRM leads), MailDesk quietly marks one of them as the primary link and the others as secondary. The primary link is the one that:
- receives automatic reply logging — your sent replies and the customer's replies are logged to the primary record's chatter, and
- is used to route a reply to the right place when the email is part of a back-and-forth.
The first record you link (or the record you create from the email) becomes primary. If the set of links changes, MailDesk always keeps exactly one primary — the oldest stays primary and the rest become secondary. You can change which one is primary at any time.
Primary and secondary apply per record type
The primary/secondary distinction is within one record type. An email can have a primary CRM lead and, quite separately, a primary Helpdesk ticket.
Links survive folder moves
A link is attached to the email itself, not to the folder it happens to sit in. Move a linked email to Archive, drop it into a custom folder, or change its labels — the link stays in place. And when MailDesk groups related messages into one conversation, links are carried across to the related messages too, so the whole thread stays connected to the record.
Troubleshooting
| You see | Likely cause | What to do |
|---|---|---|
| No Link to Record button on the open email | MailDesk Pro is not installed, or the email is a draft | Install Pro; the action appears on received and sent emails, not drafts |
| No dedicated side panel for a record type | The matching integration isn't installed or is off for the mailbox | Install and switch on the integration (CRM, Helpdesk, Sales, Calendar); you can still link generically with Link to Record |
| A record type you expect is missing from the picker | You don't have Odoo access to that app | You can only link to apps you can already open — ask for the relevant Odoo access |
| The linked email doesn't show in the record's chatter | The record was already open before the link was saved | Reload the record; see Chatter integration |
| You linked the wrong record | — | In the Connect Records window, click the linked record again (or use its ×) to unlink it — the change applies immediately |
Removing a link is not deleting the email
Removing a link only severs the connection. The email stays in your mailbox and the Odoo record stays exactly as it was.
Related
- Chatter integration — how linked emails appear inside a record, and the internal discussion thread on an email
- Composing and sending
- Permissions & data access
- Licensing & tiers