Set up your AI provider
Your team would love an assistant that scans incoming mail for threats, summarises long threads in a sentence, and drafts replies for them — but you want to decide which AI does it and where your email goes. That is exactly what this page sets up. It is a one-time, administrator-only configuration: connect MailDesk to the AI provider of your choice, test it, switch it on, and the whole team gets the assistant — with no keys to enter and no fiddly per-user setup.
Available in: Pro. (The Cockpit manager briefings reuse the same provider.) Basic has no AI.
Your team would love an assistant that scans incoming mail for threats, summarises long threads in a sentence, and drafts replies for them — but you want to decide which AI does it and where your email goes. That is exactly what this page sets up. It is a one-time, administrator-only configuration: connect MailDesk to the AI provider of your choice, test it, switch it on, and the whole team gets the assistant — with no keys to enter and no fiddly per-user setup.
What you get out of it
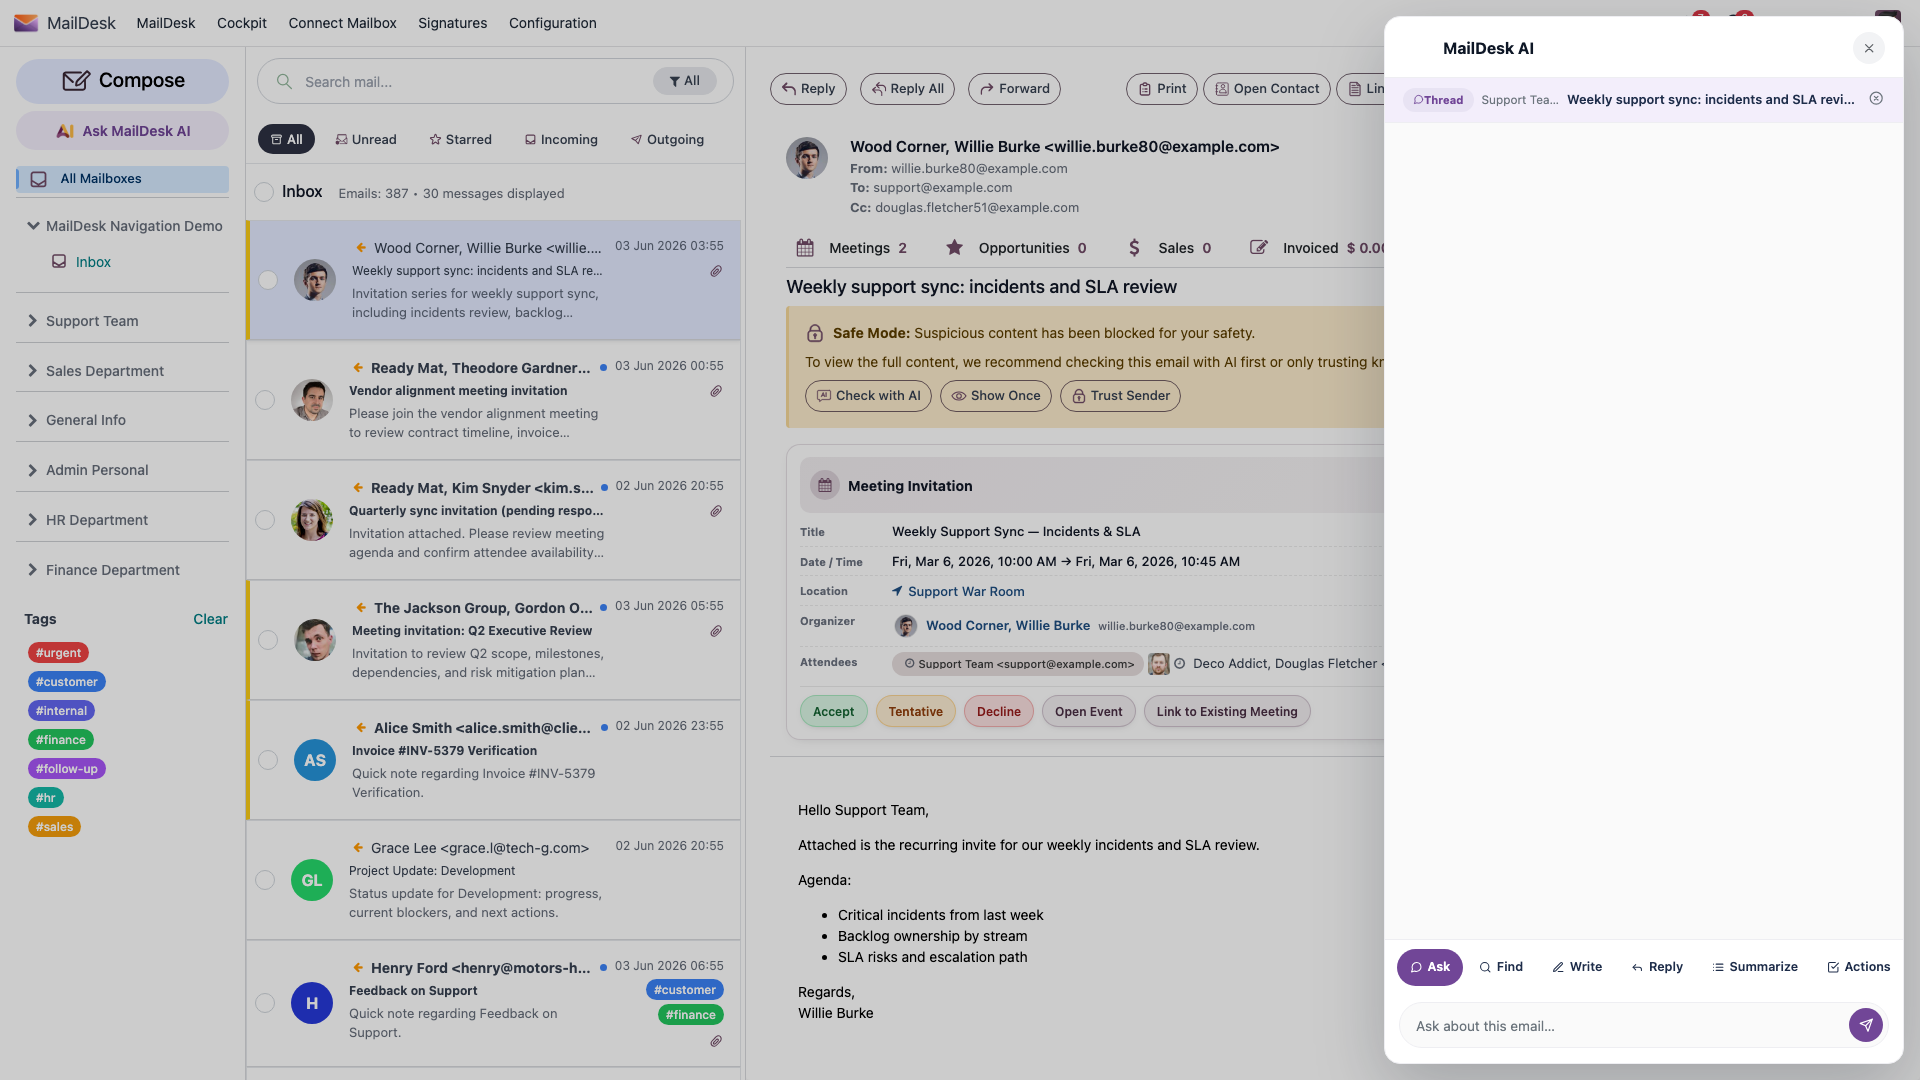
Once a provider is configured and active, everyone who uses a mailbox can run Security Scan, Summarise, Draft a reply, and the thread-aware Ask AI dialog right inside their inbox.
Why MailDesk does it this way
- You choose where AI runs. Pick a major cloud provider, or keep every word on your own network with a local server on your own hardware. It is your call, per deployment.
- Your keys stay protected. API keys are stored in Odoo's system parameters, never in an exportable field, and are never shown again after you save them — not even to you.
- One setup for the whole team. You configure the provider once. Your colleagues never see a key or a setting; they just get the assistant.
- Match the model to the job. Use a fast, economical model for high-volume summaries and a stronger one for drafting important replies — without changing anything else.
Which providers you can use
Choose any one of these. All of them are first-class — pick the one your organisation already trusts.
| Provider | Good to know |
|---|---|
| OpenAI (ChatGPT) | The familiar GPT models |
| Google Gemini | Generous free tier — handy for high-volume summarising |
| Anthropic Claude | Strong, careful writing for reply drafts |
| xAI Grok | Grok models from xAI |
| DeepSeek | Cost-effective option |
| Custom / Local Server | Your own OpenAI-compatible server (Ollama, LM Studio, vLLM) — nothing leaves your network |
Before you start
- MailDesk Pro installed and licensed.
- Administrator access to Odoo.
- One of the following:
- An account and API key with a supported cloud provider (OpenAI, Google Gemini, Anthropic Claude, xAI Grok, or DeepSeek), or
- A reachable OpenAI-compatible local server (for example Ollama, LM Studio, or vLLM).
- Your Odoo server must be able to reach the provider. A cloud provider needs outbound internet access; a local server must be reachable from the Odoo server, not just from your laptop.
- The small Python package for your chosen provider, installed on the Odoo server (see Install the provider package below).
- MailDesk works on Odoo 17, 18, or 19 — the steps below are the same on each.
No provider yet? Two features still work out of the box
Even before you configure anything, Security Scan and the editor's Ask AI keep working — they fall back to Odoo's built-in AI service (shown as OdooBot). Summarise and Draft a reply need a provider of your own. Configuring one below switches on every feature and puts you in control of the model and where your data goes.
Install the provider package
Each provider talks through a small Python package on your Odoo server. These are optional — install only the one for the provider you intend to use. MailDesk loads the package the first time AI runs and, if it is missing, shows a clear message naming the exact package to install.
| Provider | Install command |
|---|---|
| OpenAI (ChatGPT) | pip install "openai>=1.0.0" |
| Google Gemini | pip install "google-genai>=1.0.0" |
| Anthropic Claude | pip install "anthropic>=0.20.0" |
| xAI Grok | pip install "openai>=1.0.0" |
| DeepSeek | pip install "openai>=1.0.0" |
| Custom / Local Server | pip install "openai>=1.0.0" |
Install it on the right machine
Install the package into the same Python environment Odoo runs in, then restart Odoo. On Odoo.sh or a managed host, add the package to your project's requirements so it survives a rebuild.
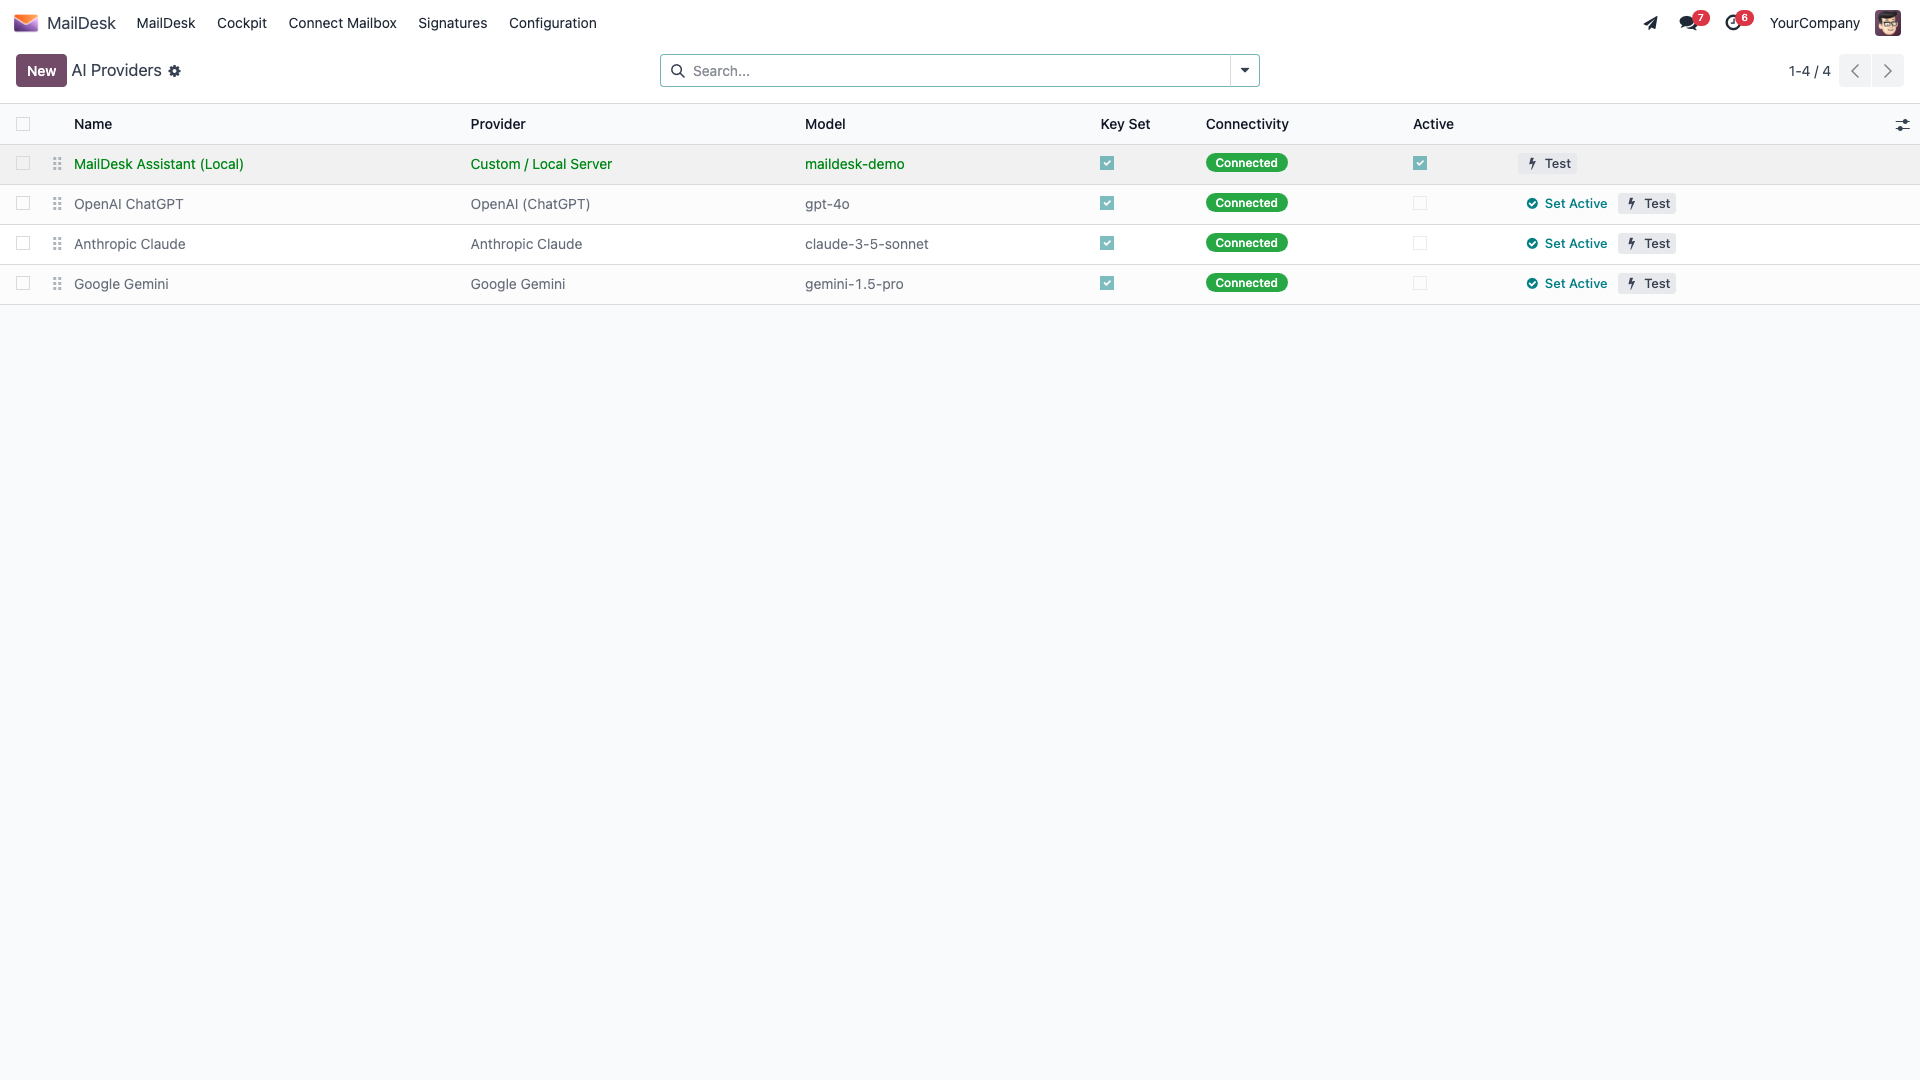
Step 1 — Open the AI Providers list
In Odoo, go to MailDesk → Configuration → MailDesk Settings → AI Providers. This is your home for every AI backend. To add one, create a new provider record.
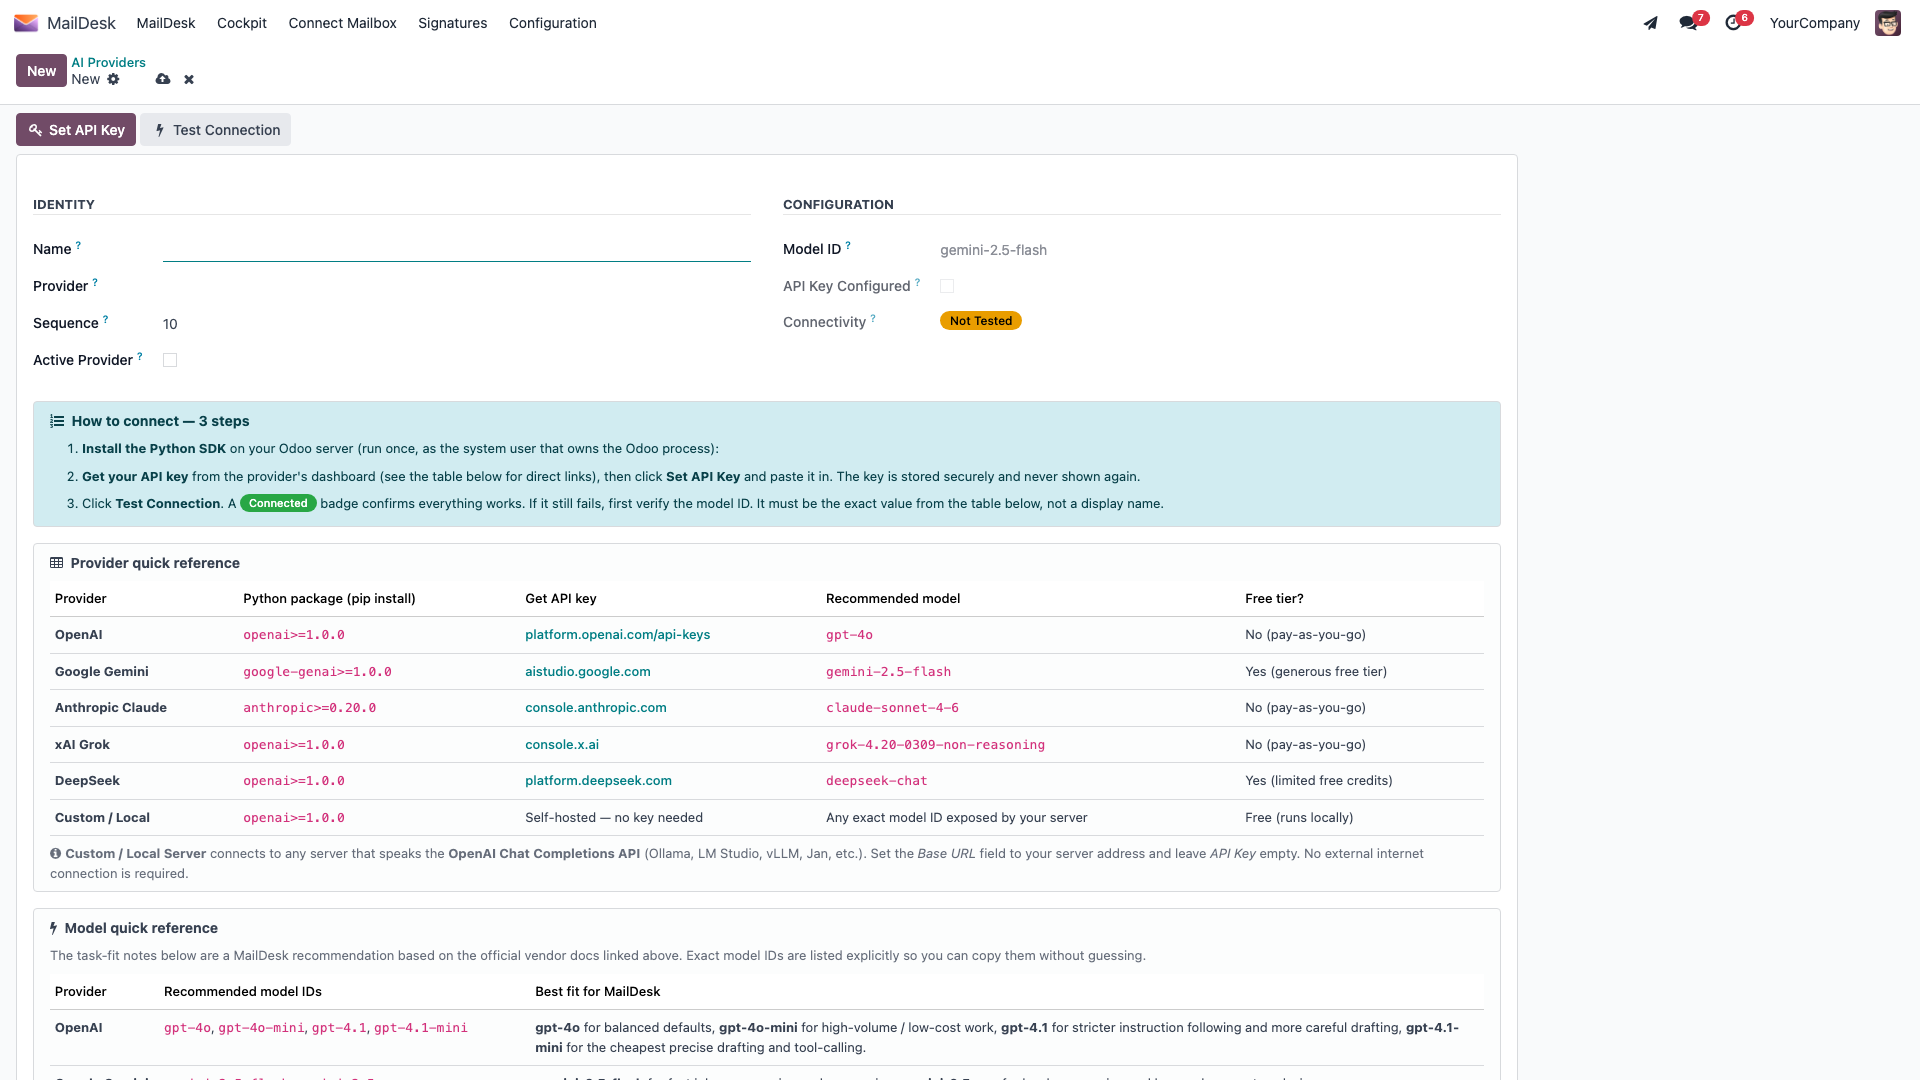
Step 2 — Choose the provider and (optionally) a model
On the new record:
- Give it a clear name you will recognise later — for example GPT-4o Production.
- Pick the provider from the list: OpenAI (ChatGPT), Google Gemini, Anthropic Claude, xAI Grok, DeepSeek, or Custom / Local Server.
- Optionally set a model identifier. Leave it empty and MailDesk uses a sensible default for that provider.
If you leave the model blank, these are the built-in defaults — and the most common alternatives if you want to choose:
| Provider | Default model | Other common choices |
|---|---|---|
| OpenAI (ChatGPT) | gpt-4o |
gpt-4o-mini, gpt-4.1, gpt-4.1-mini |
| Google Gemini | gemini-2.5-flash |
gemini-2.5-pro |
| Anthropic Claude | claude-sonnet-4-6 |
claude-opus-4-7, claude-haiku-4-5-20251001 |
| xAI Grok | grok-4.20-0309-non-reasoning |
grok-4.20-0309-reasoning |
| DeepSeek | deepseek-chat |
deepseek-reasoner |
| Custom / Local Server | (set the model your server expects) | — |
A lighter model for busy inboxes
For mailboxes that handle a lot of mail, a lighter model (for example gemini-2.5-flash,
gpt-4o-mini, or deepseek-chat) keeps costs down. Save a stronger model for where the
quality of a written reply matters most.
Step 3 — Enter your API key
- On the provider record, click Set API Key.
- Paste your provider key into the wizard. (The wizard links straight to each provider's key page if you still need to create one.)
- Click Save Key.
The record then shows API Key Configured, so you always know a key is in place — without ever exposing the key itself.
The key cannot be read back
Once saved, the key is masked and cannot be retrieved from MailDesk. Keep a copy in your password manager or your provider's portal. The key lives in Odoo's system parameters, not in any exportable field, and is never written to logs. To replace it later, just open Set API Key again and paste a new one; to remove it, use Clear Stored Key.
Step 4 — Make it the active provider
- Back in the AI Providers list, open the provider you want to use and click Set as Active (or tick Active Provider on the record).
- Only one provider is active at a time — activating one automatically switches the others off, so there is never any ambiguity about which AI is handling your mail.
Step 5 — Test the connection
- Click Test Connection on the provider record.
- MailDesk sends a quick check to the provider and tells you the result. A green Connected status means everything is wired up correctly. If it reports Connection Failed, the message will point you at the key or the model name to fix.
What you should see next
Open any email and, after a moment, a security badge appears; Summarise and Ask AI become available on threads. Your AI assistant is now live for every mailbox that has AI switched on (see Per-mailbox settings below).
![]()
Keep everything on your own network (local / self-hosted)
If all AI processing must stay on your own infrastructure — a regulated industry, sensitive data, a strict compliance rule — choose the Custom / Local Server provider. No email content leaves your network. See Privacy: what is sent to your AI provider.
- Create a provider record and choose Custom / Local Server.
- Set the Base URL of your OpenAI-compatible server. This is required for the custom
provider. For example:
- Ollama —
http://localhost:11434/v1 - LM Studio —
http://localhost:1234/v1 - vLLM —
http://localhost:8000/v1
- Ollama —
- Set the Model name exactly as your server exposes it (for example
llama3.2). - If your server needs an authentication key, set it via Set API Key; otherwise leave it empty.
- Click Set as Active, then Test Connection.
The base URL must end in /v1
MailDesk expects an OpenAI-compatible endpoint. The base URL must point at the API root
that ends in /v1 (for example http://localhost:11434/v1), and the server must be
reachable from the Odoo server, not just from your workstation.
Route specific tasks to different providers (optional)
By default, every AI task uses your single active provider — simple and predictable. But you can send individual tasks to different providers if you like: for example, Gemini for summaries (generous free tier) and OpenAI for reply drafting (top quality), without changing the global default.
- Go to MailDesk → Configuration → MailDesk Settings → Settings and find the AI provider overrides.
- For each task, choose a provider, or leave it on — Use active provider —.
| Task setting | What it controls |
|---|---|
| Security Scan Provider | The phishing / impersonation check that runs when you open an email |
| Thread Summary Provider | The Summarise action on a thread |
| Reply Draft Provider | The Draft a reply action |
| Ask AI / Editor Provider | The thread-aware Ask AI dialog and the editor's "Ask AI" |
Per-mailbox settings
Having a provider active does not force AI onto every mailbox. AI is controlled per mailbox, and each mailbox carries its own preferences.
Open MailDesk → Configuration → Mailboxes → Mailbox Accounts → [account]:
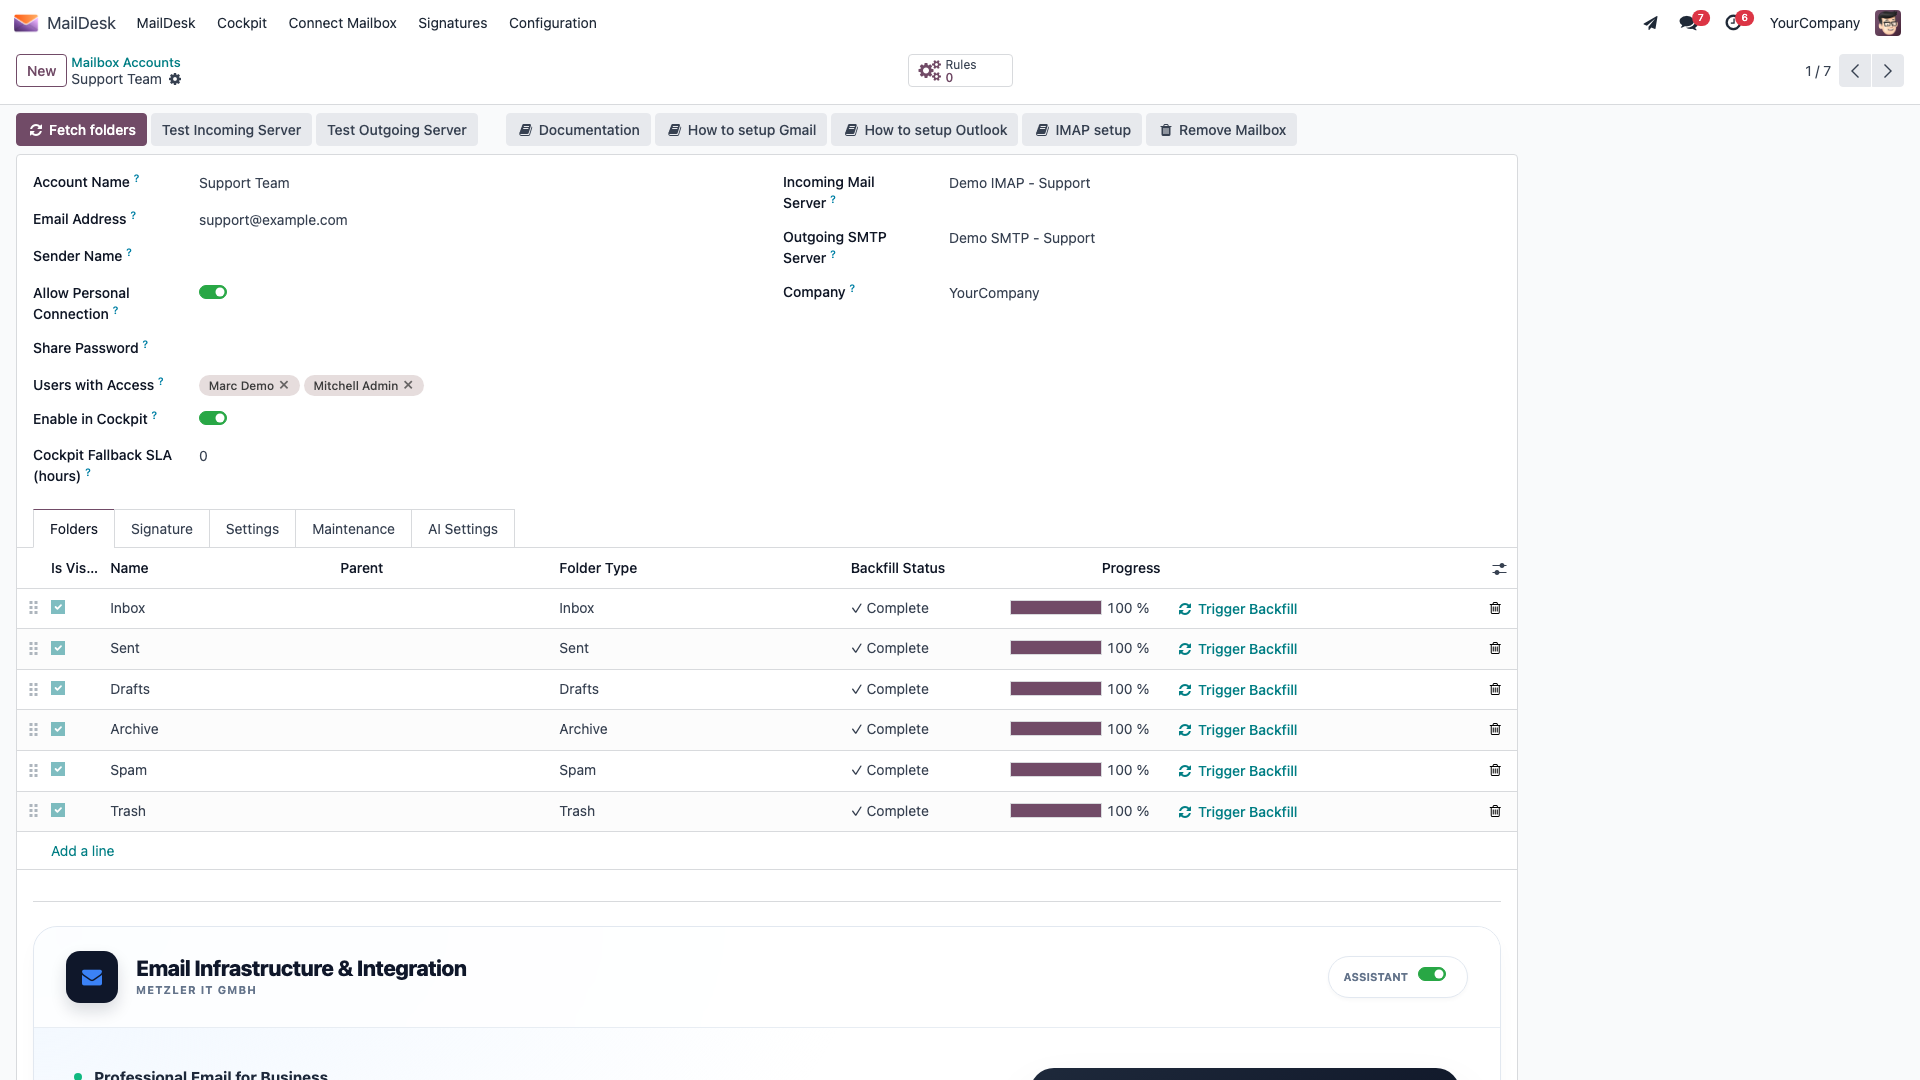
- Allow AI Features — must be on for AI to run for that mailbox. On by default; switch it off and all AI for that mailbox stops, no exceptions.
- Allow AI Attachment Analysis — off by default. Even when on, attachment content is only ever sent on an explicit action by the user. See Privacy.
- Team / Mailbox Context — optional free-text background (your team, role, or communication style) the AI uses to make summaries and drafts fit your world.
- Default Reply Tone — Professional (default), Formal, Friendly & Warm, Technical & Precise, or Concise (Short).
Turning AI off
You can switch AI off at several levels — and each one is enforced on the server, not just hidden in the interface:
- For one mailbox — switch Allow AI Features off on that mailbox account.
- For one feature (Security Scan, Summarise, and so on) or everything at once — an administrator can disable it in MailDesk settings.
- Remove a provider entirely — open the provider record and delete it; the stored key is cleared with it.
If something is not working
| What you see | Likely cause | What to do |
|---|---|---|
| No security badge on emails | No provider configured or active | Add a provider, Set as Active, then Test Connection |
| Test Connection reports an error | Wrong/expired key, no network path, or wrong model name | Re-enter the key (fresh copy, no stray spaces); confirm the Odoo server can reach the provider; check the model name |
| "Package not installed" message | The provider's Python package is missing | Run the pip install command for that provider, then restart Odoo |
| "API key invalid" | Wrong or expired key | Re-enter the key via Set API Key |
| "Quota exhausted" | Provider rate or billing limit reached | Raise your provider plan or switch to a lighter model |
| AI options greyed out for a mailbox | Allow AI Features is off for that mailbox | Switch it on for that mailbox account |
| Local server "connection failed" | Server not running, or wrong/unreachable URL | Start the server; the base URL must end in /v1 and be reachable from the Odoo server |
Related
Available in MailDesk Pro 18.0.4.1.0+. Provider list, labels, and defaults verified against the Pro AI code.